Someone tells you to move two boards left and aim between the second and third arrows. You look down the lane, see a few markings and wonder how everyone else knows exactly where they are throwing the ball. Once you understand those markings, that advice becomes much easier to follow.
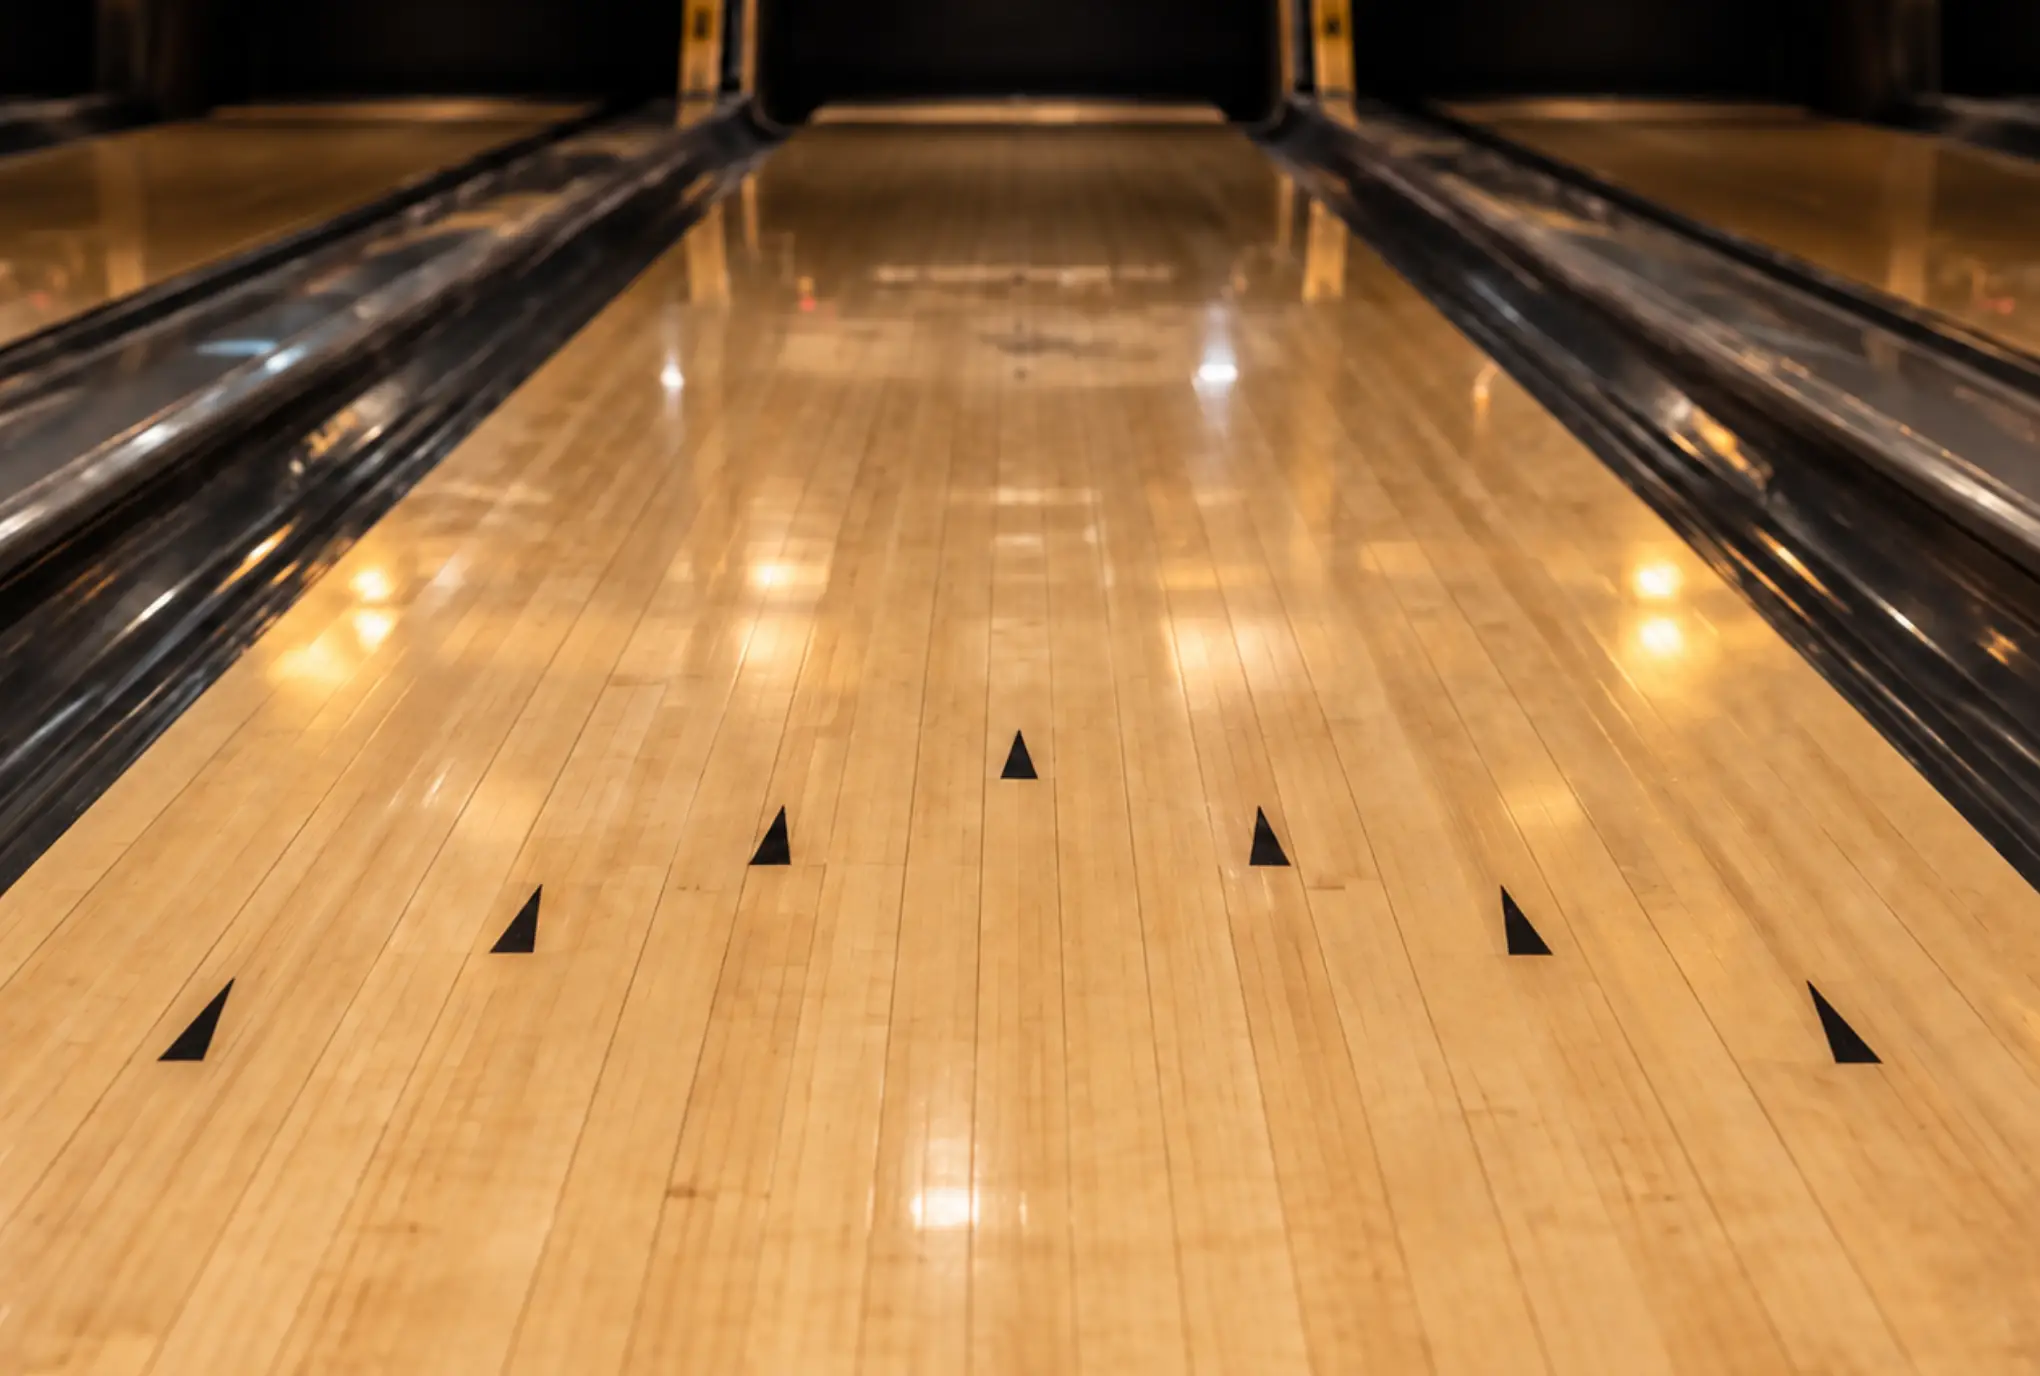
As you probably know, a standard tenpin bowling lane has 39-boards, with seven familiar targeting arrows on boards 5, 10, 15, 20, 25, 30 and 35. The arrows sit about 15 feet beyond the foul line. They give you a closer reference for aiming, while the boards help you describe your foot position, ball path and adjustments.
When I started bowling, hitting one target at the arrows took most of my attention. More than a two decades later, I am still learning to see everything that happens after the ball crosses it.
How many boards are on a bowling lane?
The standard layout has 39 boards, with board 20 in the middle. Board 1 is at the right edge, board 20 is the centre and board 39 is at the left edge. Moving left therefore means moving towards higher numbers. Moving right means moving towards lower numbers.
Left-handed bowlers often reverse the count and start at the left gutter. That makes the second arrow from the left their board 10, although it is board 30 when counted from the right. Both descriptions can refer to the same place.
Bowling arrow numbers: which arrow is on which board?
The seven arrows are spaced five boards apart. Use this chart when facing the pins and counting from the right gutter.
Arrow & Board Numbers
Target arrows counted from right to left across the lane:
You can also aim between arrows. Board 12, for example, is two boards left of the second arrow when counting from the right. There does not need to be a painted symbol on every board for you to use it as a target.
What do the dots and other lane markings mean?
Approach dots help you line up your feet. However, their number and distance from the foul line can vary between centres. Check them when bowling somewhere unfamiliar rather than assuming that standing beside a particular dot gives you your usual approach distance.
The dots on the lane itself, around seven to eight feet past the foul line, offer a closer aiming reference. They are not as commonly used as the arrows, but some very good players (for example, Stu Williams) aim at the dots as well.
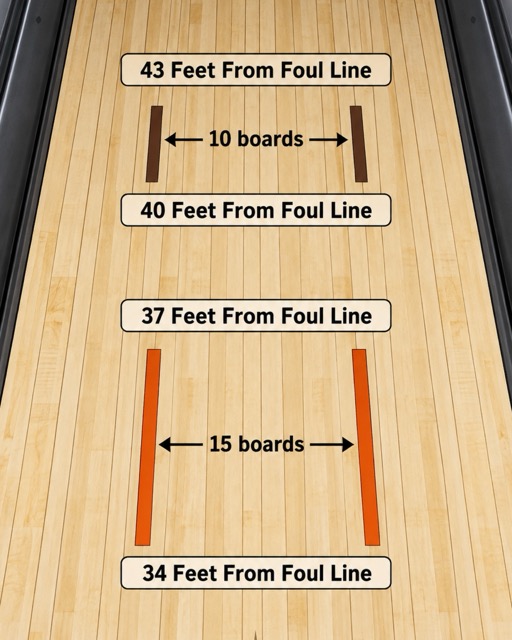
Farther down the lane, some synthetic lanes have dark marks called range finders. These commonly extend from 34–37 feet and 40–43 feet and can help you judge the ball’s path downlane. They are especially useful for checking whether your ball reached the desired exit point. Unfortunately, they are not present on every lane.
Where should you aim when bowling?
The centre of the head pin is 60 feet from the foul line. The arrows are much closer, which makes them a useful place to judge whether you sent the ball where you intended. The final destination is still the pins, but an arrow gives you a checkpoint along the way.
For beginners, USBC coaching guidance uses the second arrow from the bowling-hand side as a starting target. That means the second arrow from the right for a right-hander and the second from the left for a left-hander. It is a starting reference, not a strike formula: your delivery, ball and lane conditions determine whether that line works.
Choose a target you can identify clearly, note where you stand and try several shots. If you miss it, you have something specific to practise. If you hit it repeatedly but the ball misses the pocket, you have a reason to adjust the line.

One target was enough... At first
My first version of targeting was straightforward: pick a spot at the arrows and keep looking at it until the ball passed. At the beginning, I sometimes could not even tell which board I had crossed because of many distractions around.
With practice, I became better at recognising whether I had hit my target at the arrows. Then another problem became obvious: I could hit the same board at the arrows and still get different results.
Now I try to picture a complete line before stepping into the shot: where the ball should cross the arrows, where it should leave the oil pattern, where it should turn towards the pocket and how it should continue through the pins. That does not mean trying to flick my eyes between several targets during the approach. I settle on my aiming point, then watch the ball’s path after it passes.
Even after more than two decades in this sport, I still find it difficult to catch every detail on one shot, particularly in league or tournament play, when distractions are everywhere.
If you are learning, start by seeing one part clearly. Being able to say that you aimed at board 10 but crossed board 12 is already much more useful than saying the shot felt wrong.
Arrow target and breakpoint
Imagine one shot travelling almost straight over board 10 and another crossing board 10 while heading towards the gutter before hooking back. You hit the same target, but you did not throw the same line.
A ball can cross the same board at the arrows on different angles.
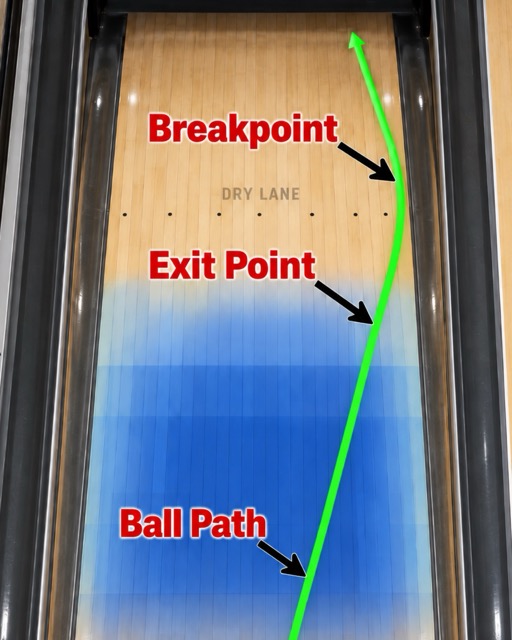
A breakpoint is the area farther downlane where the ball reaches the outside of its path before turning back towards the pocket. It should not be confused with the arrows or automatically treated as the end of the oil pattern (that is an exitpoint). In his guide to reading oil patterns and building a line, coach Panagiotis Vardakis explains how he works backwards from the intended breakpoint area to choose the rest of the shot. Take a look if you want to learn more about this topic.
Which part of your foot should you use to line up?
At first, I used the outside edge of my sliding foot when describing where I stood. It seemed normal to me, but it made conversations with coaches and other bowlers harder because we were using different references. I later understood my mistake and changed to inside edge.
One think worth mentioning is that your foot position is not the ball’s release position, either. The ball passes beside your sliding foot, so knowing where you stand does not tell you exactly where it lands. USBC’s swing-alignment guidance distinguishes your stance, finishing position and laydown point. Keep those separate when making notes about a line.
Do you have to finish on the board where you started?
In my own approach, I normally drift (move sideways) by roughly four boards between my starting position and slide. That is useful information when I line up. Looking only at my starting board would leave part of the picture missing.
Finishing on a different board is not automatically a problem if you repeat the movement. There is also no universal number of boards every bowler should move.
Check your finishing position during practice, using the same part of the shoe each time. If you start from the same place but finish in noticeably different places, it becomes harder to know whether a change in ball reaction came from the lane or your delivery.
Should you move your feet, your target or both?
My first adjustment is usually with my feet, keeping my eyes on the same target. A small move lets me test a different launch angle without immediately changing everything else. This is the sort of measured adjustment I discuss in our article about why you keep leaving the 10 pin.
However, I cannot keep moving my feet indefinitely while looking at the same spot and expect the line to keep working. When I need a broader adjustment, I move my feet and target together, often using a 2-and-1 move: two boards with my feet and one board with my target, in the same direction.
For example, counting from the right, standing on board 25 and targeting board 15 would become standing on 27 and targeting 16 after a 2-and-1 move left. USBC describes this as an angular adjustment. Moving your feet and target by equal amounts is a parallel adjustment. Neither guarantees the ball will reach the same breakpoint or strike.
Before moving, check whether you actually made the shot you intended. A pulled delivery does not necessarily mean your line needs changing. Give yourself a fair comparison by keeping your ball, release and intended speed as similar as possible while testing the move.
A simple way to practise using bowling lane arrows
During your next practice session, give yourself a task beyond counting strikes. Choose one target and record your starting board, finishing board and where the ball crossed the arrows. You can write a quick note after each shot rather than trying to remember an entire game.
Once you can identify those points reliably, add one farther-downlane reference. Did the ball reach the area you pictured, or did it turn earlier or travel farther outside? A coach or a video taken from behind can help you check what you thought you saw. Just don't make common mistakes when filming your bowling.
The same markings also give you repeatable references for spare shooting. Keep a record of the starting positions and targets that work for you, and read Vardakis’s advice on building confidence in your spare game if the numbers start distracting you from making a comfortable shot.
There will still be shots you cannot explain, and strikes you know you got away with. But when you can say where you stood, where you slid and where the ball travelled, you have something useful to take into the next frame. That is when the markings stop looking like bowling jargon and start helping you bowl.
FAQ
How many boards are on a bowling lane?
A standard tenpin lane uses 39 boards, with board 20 in the centre. This numbering also applies to the board markings on synthetic lanes.
How many arrows are on a bowling lane?
The familiar layout has seven arrows, spaced five boards apart on boards 5, 10, 15, 20, 25, 30 and 35.
How far are bowling lane arrows from the foul line?
The arrows are approximately 14–16 feet beyond the foul line, commonly described as about 15 feet down the lane.
What board is the second arrow in bowling?
The second arrow from the right is board 10 when counting from the right gutter. For left-handers counting from the left, the second arrow from that side is also called board 10. It is board 30 in a right-to-left count.
Where should a beginner aim in bowling?
The second arrow from your bowling-hand side is one possible starting target. Try to repeat your starting position and delivery, then use the results to adjust. No single arrow works for every bowler or lane condition.
What is a 2-and-1 adjustment in bowling?
Move your feet two boards and your target one board in the same direction. This is an angular adjustment, so watch the next shot to see how the new line affects the ball’s path.
Your Weekly Bowling Digest
The latest bowling news, tips, and gear reviews—all wrapped up in a quick 3-minute read delivered straight to your inbox.